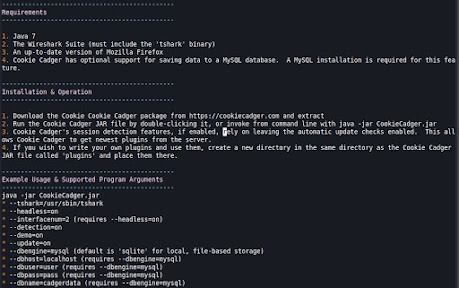
發表文章

目前顯示的是 5月, 2021的文章

DNSchef(封包擷取或假造資料)

圖片
dnschef~封包擷取或假造資料 DNSChef is a highly configurable DNS Proxy for Penetration Testers and Malware Analysts. It is capable of fine configuration of which DNS replies to modify or to simply proxy with real responses. In order to take advantage of the tool you must either manually configure or poison DNS server entry to point to DNSChef. The tool requires root privileges to run on privileged ports. sudo dnschef -h usage: dnschef [options]:           _                _                      | | version 0.4  | |        / _|         | |_   ___  ___| |   ___| |_        / _` | '_ \/ |/ | '_ \ / _ \  _|      | (_| | | | \__ \ (| | | |  / |         \__,_|_| |_|___/\___|_| |_|\___|_|                      iphelix@thesprawl.org   DNSChef is a highly configurable DNS Proxy for Penetration Testers and Malware Analysts. It is capable of fine configuration of which DNS replies to modify or to simply proxy with real responses. In order to take advantage of the tool you must either manually configu

DHCPig~壓力測試

圖片
針對 DHCP server 壓力測試 安裝指令: sudo apt-get install dhcpig  例如: sudo dhcpig -f eth0 參考: http://github.com/kamorin/DHCPig 執行: 抓取網路上的 DHCP client 請求 Listen for DHCP Requests from other clients if offer detected, respond with request for that offer. 從DHCP server 索取所有IP Loop and Send DHCP Requests all from different hosts & MAC addresses 找出網路上電腦IP, 並讓其釋放原分配的IP ARP for all neighbors on that LAN, then send DHCPReleases to server ==================================== Usage:     pig.py [-h -v -6 -1 -s -f -t -a -i -o -l -x -y -z -g -r -n -c ] <interface>    Options:     -h, --help                     <-- you are here :)     -v, --verbosity                ...  0 ... no         (3)                                         1 ... minimal                                        10 ... default                                        99 ... debug                                             -6, --ipv6                     ... DHCPv6 (off, DHCPv4 by default)     -1, --v6-rapid-commit          ... ena

sslyze 找出網站有關SSL訊息

圖片
找出網站有關SSL相關訊息 安裝:   sudo apt-get update --fix-missing    sudo apt-get install sslyze 例如: sudo sslyze --version  <URL> sudo sslyze --regular  <URL> ============================================= sudo sslyze -h              Usage: sslyze [options] target1.com target2.com:443 target3.com:443{ip} etc... Options:   --version             show program's version number and exit   -h, --help            show this help message and exit   --regular             Regular HTTPS scan; shortcut for --sslv2--sslv3--tlsv1                         --tlsv1_1--tlsv1_2--tlsv1_3--reneg--resum--certinfo--                         hide_rejected_ciphers--compression--heartbleed--                         openssl_ccs--fallback--robot--elliptic_curves   Trust stores options:     --update_trust_stores                         Update the default trust stores used by SSLyze. The                         latest stores will be downloaded from https://github.c                         om/nabla-c0d3/trust_stores_

dotdotpwn 測試http, ftp , tftp 漏洞

圖片
檢測 http, ftp, tftp 是否存在漏洞 指令:  sudo apt-get install dotdotpwn 執行: sudo dotdotpwn -m http -h <網域>

commix

圖片
針對 http 的網站網址執行全面性 Injection and Exploitation 方式 下載更新版本網址:  https://github.com/commixproject/commix.git 執行:  sudo python commix.py --url <網域名稱或 IP>  --level 3 ====================================== *** sudo commix -h [warning] Python version 3.9.1+ detected. You are advised to use Python version 2.7.x. Usage: commix [option(s)] Options:   -h, --help            Show help and exit.   General:     These options relate to general matters.     -v VERBOSE          Verbosity level (0-4, Default: 0).     --version           Show version number and exit.     --output-dir=OUT..  Set custom output directory path.     -s SESSION_FILE     Load session from a stored (.sqlite) file.     --flush-session     Flush session files for current target.     --ignore-session    Ignore results stored in session file.     -t TRAFFIC_FILE     Log all HTTP traffic into a textual file.     --batch             Never ask for user input, use the default behaviour.     --encoding=ENCOD..  Force character encodin

dnstracer

圖片
查出整串DNS server 相關record資訊 安裝: sudo apt-get install dnstracer 指令: sudo dnstracer -s . -4 -o -c -q ns <IP或網域> sudo dnstracer -r 3 -v <IP或網域>

eyewitness 說明

圖片
查看文件檔裏頭的網址主機是否有 websites, RDP services, and open VNC servers 安裝指令: sudo apt-get install eyewitness 執行範例: (可先製作一個放著要查詢的網址的文件檔 http-url.txt) sudo eyewitness -f /home/user/http-url.txt -d screens ################################################################################ #                                  EyeWitness                                  # ################################################################################ #           FortyNorth Security - https://www.fortynorthsecurity.com           # ################################################################################ usage: EyeWitness.py [--web] [-f Filename] [-x Filename.xml]                      [--single Single URL] [--no-dns] [--timeout Timeout]                      [--jitter # of Seconds] [--delay # of Seconds]                      [--threads # of Threads]                      [--max-retries Max retries on a timeout]                      [-d Directory Name] [--results Hosts Per Page]                      [-

Cookie Cadger

圖片
 利用Java可以查看指定的網卡抓下來的封包放到Wireshark去分析 指令: 先下載..... chmod +x CookieCadger-1.06.jar mv CookieCadger-1.06.jar /usr/bin/ sudo su sudo java -jar CookieCadger-1.06.jar 下載:  https://gitlab.com/kalilinux/packages/cookie-cadger

p0f 說明

圖片
透過非主動式TCP封包去詢問設備, 取得其基本OS訊息等...  安裝指令: sudo apt-get install p0f 執行指令 sudo p0f -i eth0 -p -o p0f.txt

braa(掃描內網的 snmp設備)

圖片
用來掃描內網的 snmp設備, 麻煩是指令裏頭, 你要先知道設備的OID(snmp的樹狀結構代表碼) 安裝指令: sudo apt --fix-broken install sudo apt-get install braa

sqlmap 指令使用1

圖片
  第一次使用 sqlmap -u https://網域 --forms -a 因建議  使用 --forms --crawl=2 所以第二次下指令: sqlmap -u https://網域 --forms --crawl=2 -a  這是比較深層 檢測 有些網站 會立即偵測 我這是攻擊, 立即啟動保護喔

acccheck 安裝使用說明

圖片
 使用字典去暴力破解window(SMB)的登入帳密, 目前kali已經沒有, 所以要去下載安裝 下載: http://archive.ubuntu.com/ubuntu/pool/multiverse/a/acccheck/acccheck_0.2.1-3_all.deb 安裝指令:  sudo dpkg -i  acccheck_0.2.1-3_all.deb ================= 舉例:  可以連入LAN的電腦 IPC$ 和 ADMIN$,用字典去猜帳密 例如: sudo acccheck -t <IP> -u administrator -p 898989